Apache NiFi 1.0.0 - Authorization and Multi-Tenancy
The Apache NiFi community recently released Apache NiFi 1.0.0 BETA, marking a major milestone for the community. The community has been working towards this major release for several months, and it will contain many new features and improvements.
The clustering model has been refactored to remove the NiFi Cluster Manager, which was previously a statically defined instance, and replace it with a cluster coordinator that is automatically elected using ZooKeeper. There is a great post by Pierre Villard providing an overview of the new clustering model and how to set up a new cluster.
The authorization model has also been refactored to support a more fine-grained security model. Previously NiFi had the concept of roles, and each role had a set of permissions. For example, a user could be a “monitor” with a read-only view of the dataflow, or a “data flow manager” with ability to modify the flow. The limitation of this model was that a user had permission to modify everything, or nothing, but many times the desire was to restrict access to only a portion of the dataflow. The new authorization model addresses this by providing a policy-based approach where all components are protected by a policy, or inherit the policy of their parent if none exists for the given component.
The remainder of this post will cover how to setup a secure cluster with the new authorization model, and how to start configuring policies for a multi-tenant environment.
Certificates
In order to create a secure NiFi cluster, we need a keystore and truststore for each node in the cluster, and a client certificate that we can load in our browser to access the UI. At this point many people get frustrated with all of the steps required to generate certificates, but those days are over!
ENTER The Apache NiFi Toolkit….
The Apache NiFi Toolkit will be an additional artifact produced when building NiFi, and will provide common utilities outside of the normal NiFi application. The first tool provided will be a TLS toolkit to help generate certificates.
A convenience binary for the NiFi Toolkit will be provided for the official 1.0.0 release, but for this post I am working off the latest master code as of August 17th at 9am eastern. After doing a full build of the NiFi source code, the toolkit binary is located at the following path:
nifi-toolkit/nifi-toolkit-assembly/target/nifi-toolkit-1.0.0-SNAPSHOT-bin.tar.gz
Lets copy that to a new directory where we are going to setup our cluster and extract the tar. The contents after extracting it are the following (subject to change before the official 1.0.0 release):
nifi-toolkit-1.0.0-SNAPSHOT
├── LICENSE
├── NOTICE
├── bin
│   ├── tls-toolkit.bat
│   └── tls-toolkit.sh
├── classpath
│   ├── log4j.properties
│   └── overlay.properties
├── conf
│   ├── config-client.json
│   └── config-server.json
└── lib
The TLS toolkit has two modes, client/server and standalone. For this scenario we are interested in standalone mode. If you want to see all of the usage options for standalone mode, you can run ./bin/tls-toolkit.sh standalone -h to get a detailed listing.
We are going to setup a two node secure cluster, so we want to generate the keystore, truststore, and config for two nodes, as well as a client cert for our browser. We can do that by running the following command:
./bin/tls-toolkit.sh standalone -n 'localhost(2)' -C 'CN=bbende, OU=ApacheNiFi' -o './target'
- -n ‘localhost(2)’ tells the toolkit that we want to run two NiFi instances on localhost
- -C specifies the DN of the client certificate that will be generated
- -o specifies the directory to use for the output.
Listing the target directory shows the following:
target/
├── CN=bbende_OU=ApacheNiFi.p12
├── CN=bbende_OU=ApacheNiFi.password
├── localhost
│   ├── keystore.jks
│   ├── nifi.properties
│   └── truststore.jks
├── localhost_2
│   ├── keystore.jks
│   ├── nifi.properties
│   └── truststore.jks
├── nifi-cert.pem
└── nifi-key.key
From this output we can see the following….
- We have a p12 to load in our browser with the password provided in the corresponding .password file
- We have two instance directories (localhost and localhost_2) each with their keystore, truststore, and pre-configured nifi.properties
Now we can move on to setting up the cluster…
Cluster Configuration
In the same directory where we extracted the toolkit, lets download the Apache NiFi 1.0.0-BETA and create two copies, one for each node of the cluster….
wget http://mirror.olnevhost.net/pub/apache/nifi/1.0.0-BETA/nifi-1.0.0-BETA-bin.tar.gz
tar xzvf nifi-1.0.0-BETA-bin.tar.gz
mv nifi-1.0.0-BETA nifi-1
cp -R nifi-1 nifi-2
We should now have the following setup in our directory:
ls -l
nifi-1
nifi-2
nifi-toolkit-1.0.0-SNAPSHOT
Lets copy the configuration generated by the TLS toolkit into the appropriate instance directories:
cp nifi-toolkit-1.0.0-SNAPSHOT/target/localhost/* nifi-1/conf/
cp nifi-toolkit-1.0.0-SNAPSHOT/target/localhost_2/* nifi-2/conf/
There are few more final steps to turn these two instances into a cluster…
Edit nifi-1/conf/nifi.properties and set the following properties:
nifi.state.management.embedded.zookeeper.start=true

nifi.cluster.protocol.is.secure=true
nifi.cluster.is.node=true

nifi.zookeeper.connect.string=localhost:2181
Edit nifi-2/conf/nifi.properties and set the following properties:
nifi.cluster.protocol.is.secure=true
nifi.cluster.is.node=true

nifi.zookeeper.connect.string=localhost:2181
NOTE that we are only running the embedded ZooKeeper on the first instance for this example.
Edit nifi-1/conf/state-management.xml and set the following:
<property name="Connect String">localhost:2181</property>
Edit nifi-2/conf/state-management.xml and set the following:
<property name="Connect String">localhost:2181</property>
Edit nifi-1/conf/zookeeper.properties and set the following:
server.1=localhost:2888:3888
Edit nifi-2/conf/zookeeper.properties and set the following:
server.1=localhost:2888:3888
Create the myid file for ZooKeeper on the first instance:
mkdir nifi-1/state
mkdir nifi-1/state/zookeeper
echo 1 > nifi-1/state/zookeeper/myid
At this point the cluster could be started, but nobody would be able to access it since we haven’t defined any users and granted access to the appropriate resources (you could try starting the cluster now and hitting the UI to see the Access Denied page).
Authorizers & Initial Admin Identity
The authorizers.xml file in the conf directory specifies the available authorizers for NiFi to use. The default implementation provided by NiFi is a file-based authorizer that stores users/groups and policies in XML files in the conf directory. We need to tell the file authorizer about one user that will be allowed to access the NiFi UI. This user will be given the ability to create additional users and policies. We can do this by specifying a property called the “Initial Admin Identity”. We also need to tell the file authorizer about the identities of all the nodes in the cluster (the DNs from the certificates) so that they are given some permissions.
Edit nifi-1/conf/authorizers.xml and set the following:
<authorizer>
    <identifier>file-provider</identifier>
    <class>org.apache.nifi.authorization.FileAuthorizer</class>
    <property name="Authorizations File">./conf/authorizations.xml</property>
    <property name="Users File">./conf/users.xml</property>
    <property name="Initial Admin Identity">CN=bbende, OU=ApacheNiFi</property>
    <property name="Legacy Authorized Users File"></property>

    <property name="Node Identity 1">CN=localhost, OU=NIFI</property>
</authorizer>
Notice the “Initial Admin Identity” is the DN of the client cert (p12) we generated with the TLS toolkit, and “Node Identity 1” is the DN of the certificate being used by the two nodes of our cluster. If we were running these instances on different servers with different certificates, we would need to specify another property like “Node Identity 2” and specify both of the DNs.
Edit nifi-2/conf/authorizers.xml so that it is the same as above.
At this point we can start our cluster:
./nifi-1/bin/nifi.sh start && ./nifi-2/bin/nifi.sh start
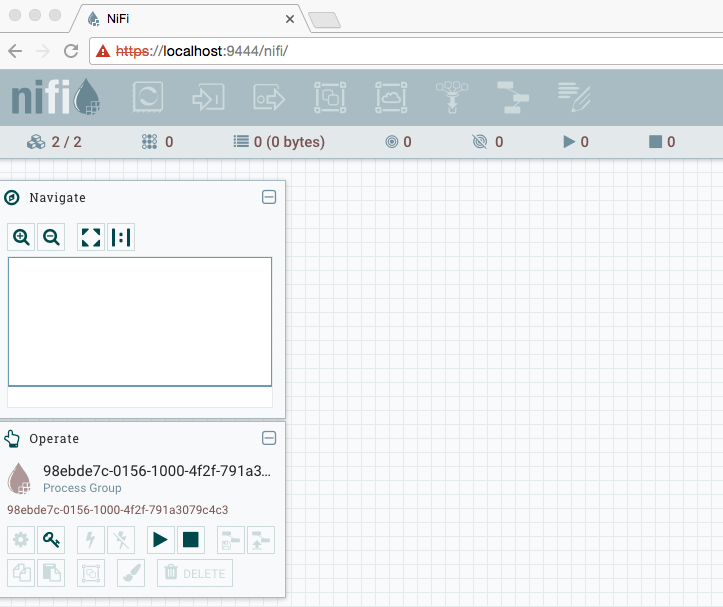
In this example the configuration generated by the TLS toolkit has nifi-1 running on https port 9443 and nifi-2 running on https port 9444. After loading the p12 generated by the toolkit into your browser and waiting a few seconds for everything to start up, we can navigate to https://localhost:9443/nifi in our browser (sometimes a browser restart is required to pick up the cert that was imported).
We should be able to get into the NiFi UI using the initial admin we configured, but you’ll notice many icons are disabled:
Lets take a look at the users and policies that were generated. Looking at nifi-1/conf/users.xml shows:
<?xml version="1.0" encoding="UTF-8" standalone="yes"?>
<tenants>
    <groups/>
    <users>
        <user identifier="4d831093-e823-32b2-a700-e171ae435d0a" identity="CN=bbende, OU=ApacheNiFi"/>
        <user identifier="c22273fa-7ed3-38a9-8994-3ed5fea5d234" identity="CN=localhost, OU=NIFI"/>
    </users>
</tenants>
There were two users created, one for the initial admin, and one for the identity of the cluster nodes.
Looking at nifi-1/conf/authorizations.xml shows:
<?xml version="1.0" encoding="UTF-8" standalone="yes"?>
<authorizations>
    <policies>
        <policy identifier="f027c60d-f2a5-35fb-8aa5-4da2f8ad6fe5" resource="/flow" action="R">
            <user identifier="4d831093-e823-32b2-a700-e171ae435d0a"/>
        </policy>
        <policy identifier="12da6c13-55e9-3bf5-a58b-83a1a2f612c0" resource="/tenants" action="R">
            <user identifier="4d831093-e823-32b2-a700-e171ae435d0a"/>
        </policy>
        <policy identifier="e8f9c462-7aee-3d9a-8646-febefeb887ce" resource="/tenants" action="W">
            <user identifier="4d831093-e823-32b2-a700-e171ae435d0a"/>
        </policy>
        <policy identifier="bf9b3e16-cf8a-3209-8cd4-6b0749c208ae" resource="/policies" action="R">
            <user identifier="4d831093-e823-32b2-a700-e171ae435d0a"/>
        </policy>
        <policy identifier="b7a56e46-95c9-3b81-bd2b-80571eb8eaf2" resource="/policies" action="W">
            <user identifier="4d831093-e823-32b2-a700-e171ae435d0a"/>
        </policy>
        <policy identifier="53eb93af-04d2-3e70-9bb7-7c4aa68182b9" resource="/controller" action="R">
            <user identifier="4d831093-e823-32b2-a700-e171ae435d0a"/>
        </policy>
        <policy identifier="fc86bc12-5b69-36d0-a02c-e5293a058c42" resource="/controller" action="W">
            <user identifier="4d831093-e823-32b2-a700-e171ae435d0a"/>
        </policy>
        <policy identifier="efeb048a-a6ce-3e7d-89c2-9fd2417b8059" resource="/proxy" action="R">
            <user identifier="c22273fa-7ed3-38a9-8994-3ed5fea5d234"/>
        </policy>
        <policy identifier="20a75180-0463-393f-9bc6-b6dee87c174f" resource="/proxy" action="W">
            <user identifier="c22273fa-7ed3-38a9-8994-3ed5fea5d234"/>
        </policy>
    </policies>
</authorizations>
We can see that the initial admin has READ/WRITE access to /flow, /tenants, /policies, and /controller, and the cluster nodes have READ/WRITE access to /proxy. This allows the initial admin to get into the UI (/flow) and to create new users/groups (/tenants), and to create new policies (/policies), but you’ll notice there are no policies granting access to the root process group, or any other components. This is why all of the actions in the toolbar are grayed-out.
We can create a policy for the root process group by clicking the key icon in the operate palette on the left. We should see the following:
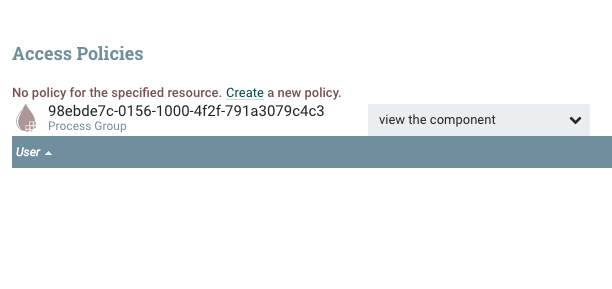
This is telling us that there is no policy defined for the “view component” action on the root process group, which essentially the READ action. If we change the dropdown to “modify the component” we should see the same thing, which is the WRITE policy for the root process group. For “view component” we can click the “Create a new policy” link and then add our user which should look like this:
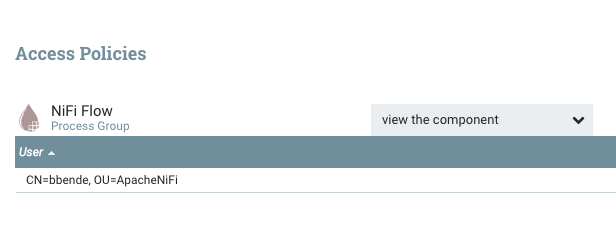
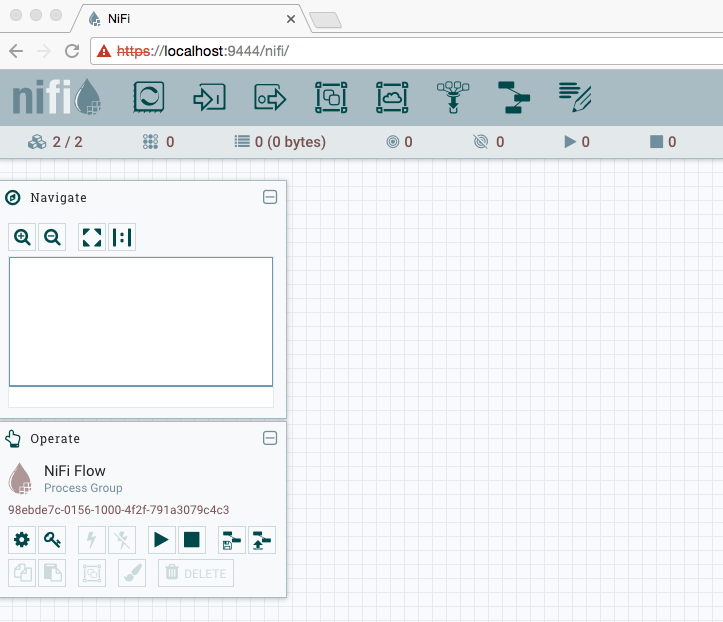
After also doing that for “modify the component”, we can return to the main canvas and on the next refresh the toolbar should be enabled and we can start creating a flow.
If we look again at nifi-1/conf/authorizations.xml we should see two new policies for the root process group:
<policy identifier="99052096-0156-1000-ffff-ffff9a4c55d2" resource="/process-groups/98ebde7c-0156-1000-4f2f-791a3079c4c3" action="R">
  <user identifier="4d831093-e823-32b2-a700-e171ae435d0a"/>
</policy>
<policy identifier="990875ac-0156-1000-0000-000059979f15" resource="/process-groups/98ebde7c-0156-1000-4f2f-791a3079c4c3" action="W">
  <user identifier="4d831093-e823-32b2-a700-e171ae435d0a"/>
</policy>
Multi-Tenancy
The policy structure is hierarchical, such that when access is checked for a component, if no policy is found then it checks the parent, and if not policy is found for the parent, it checks the parent’s parent, and so on, until reaching the root process group. This means that by giving ourselves READ/WRITE to the root group we now have READ/WRITE for all sub-components until a more restrictive policy is created.
Lets simulate how two development teams might share a single NiFi instance by creating two process groups:
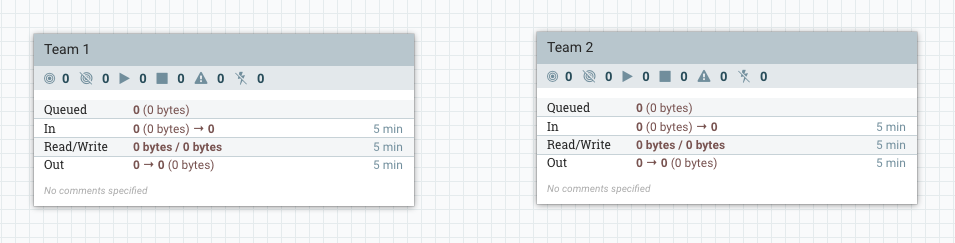
Lets go into the “Team 2” process group and create a couple of processors:

Now we’ll leave the group and return to the root group.
Lets pretend we are a member of Team 1 so we should have full access to the first process group, but we shouldn’t be able to know anything about what Team 2 is doing, and shouldn’t be able to modify their flow. We can simulate this by creating a more restrictive policy on the “Team 2” process group that does not include the current user (the initial admin).
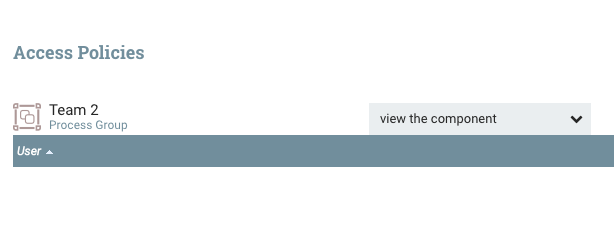
If you select the “Team 2” process group, you’ll notice the palette on the left changes and says “Team 2”. This palette always operate in the context of the selected component, so if we click the key icon while “Team 2” is selected, we are now editing the policies for the “Team 2” process group. If we click the “Override this policy” link for “view component” and create a new policy without adding users, we should get the following:
If we do the same thing for “modify the component” and then return to the main canvas we should see the following on the next refresh:
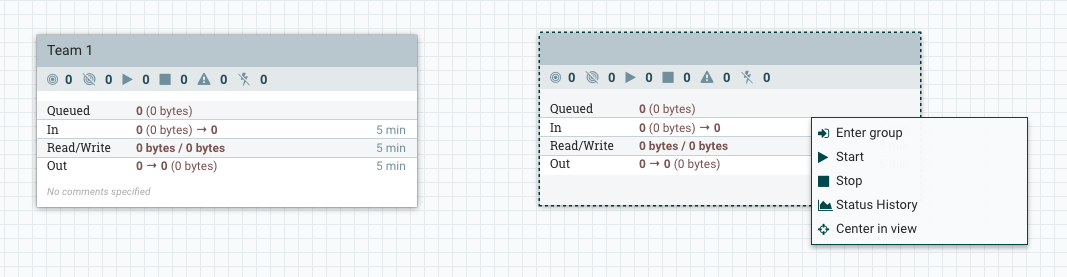
We can no longer see the name of the group, and we now have a more restrictive context menu that prevents us from configuring the group. If we enter into the group we can also no longer see any information about the processors in the group, or modify them.

In a real setup you can imagine there would be multiple users, and most likely a group for each development team where the users were added to their corresponding group, and then each group was given access to the appropriate process group.
Summary
The new authorization model provides the flexibility to model many different scenarios. In the next post I’ll walk through how to configure NiFi to use Ranger as the authorizer implementation.
blog comments powered by Disqus