Apache NiFi 1.0.0 - Kerberos Authentication
Apache NiFi supports several authentication mechanisms and provides a pluggable authentication model, allowing anyone to implement a custom identity provider. By default, NiFi always supports two-way SSL as an authentication mechanism, but also provides the ability to use LDAP or Kerberos. This post will demonstrate how to use Kerberos for authentication.
Setting up a KDC
In order to do anything with Kerberos, the first thing we need to do is setup a KDC. For this post we are going to use the docker-kdc project which makes it really easy to run a KDC on any environment.
I’m working on OSX and had previously installed docker-machine. The docker-kdc project was originally created to work with boot2docker, so to work around that we can do the following:
-
Create a boot2docker machine:
docker-machine create --driver virtualbox boot2docker eval "$(docker-machine env boot2docker)" -
Create /usr/local/bin/boot2docker with the contents provided here
We also need to install a library called jq, which I did using homebrew:
brew install jq
After that we can clone the docker-kdc git repo and cd into the directory:
git clone https://github.com/tillt/docker-kdc.git
cd docker-kdc
At the root of this directory create a file named kdc.json which will be the config file used when setting up the KDC:
{
  "principals": [
    {
      "id": "[email protected]",
      "password": "bbende"
    },
    {
      "id": "HTTP/[email protected]",
      "password": "http"
    }
  ],
  "domain": "nifi.apache.org",
  "realm": "NIFI.APACHE.ORG",
  "ip": "127.0.0.1",
  "port": 48088
}
This tells docker-kdc to create two principals, the first represents the end-user that will authenticate to NiFi, and the second is the principal that NiFi will use to talk to the KDC.
We can now build and start the KDC:
./kdc build
./kdc start
We can test the KDC by running ./kdc test and should output similar to the following:
Checking boot2docker active... ok
Trying to connect to KDC... at 192.168.99.101:48088... ok
As part of starting the KDC, a krb5.conf and krb5.keytab were generated in the docker-kdc directory.
The krb5.conf is the configuration file that clients would use to talk to the KDC running in the docker container, and krb5.keytab contains the keytabs for the principals that were specified in kdc.json.
In order to setup the current shell to leverage the krb5.conf generated by docker-kdc, and not the one in /etc, run the following command:
$(./kdc shellinit)
We should now be able to perform a kinit against the KDC using one of the principals that we specified:
kinit [email protected]
Performing a klist should show something like the following:
klist
Credentials cache: API:5D669ADD-9028-441F-A6E0-C2C78DA04CC5
        Principal: [email protected]

  Issued                Expires               Principal
Aug 31 10:12:29 2016  Aug 31 20:12:27 2016  krbtgt/[email protected]
One last bit of setup is that we will have to access NiFi using nifi.apache.org as the hostname in order to line up with the domain in our KDC.
Edit /etc/hosts and map nifi.apache.org to localhost:
127.0.0.1 localhost nifi.apache.org
Configuring NiFi
In order to perform any type of authentication, NiFi has to be configured to use https. I’ve previously covered how to create certificates and truststores using the NiFi Toolkit, so I’m going to assume readers can do that at this point.
The nifi.properties related to https would look something like the following:
nifi.remote.input.secure=true

nifi.web.https.host=localhost
nifi.web.https.port=9445

nifi.security.keystore=./conf/keystore.jks
nifi.security.keystoreType=jks
nifi.security.keystorePasswd=<your password>
nifi.security.keyPasswd=<your password>
nifi.security.truststore=./conf/truststore.jks
nifi.security.truststoreType=jks
nifi.security.truststorePasswd=<your password>
We also need to set some additional properties related to Kerberos:
nifi.security.user.login.identity.provider=kerberos-provider

nifi.kerberos.krb5.file=/path/to/docker-kdc/krb5.conf

nifi.kerberos.spnego.principal=HTTP/[email protected]
nifi.kerberos.spnego.keytab.location=/path/to/docker-kdc/krb5.keytab
nifi.kerberos.spnego.authentication.expiration=12 hours
The login identity provider is the identifier of a provider defined in login-identity-providers.xml. We need to edit login-identity-providers.xml and uncomment the kerberos-provider:
<provider>
    <identifier>kerberos-provider</identifier>
    <class>org.apache.nifi.kerberos.KerberosProvider</class>
    <property name="Default Realm">NIFI.APACHE.ORG</property>
    <property name="Authentication Expiration">12 hours</property>
</provider>
The last thing we need to do is configure the Intial Admin Identity in authorizers.xml:
<property name="Initial Admin Identity">[email protected]</property>
If you remember from previous posts, we usually put the DN from a certificate here, but since we are going to authenticate with Kerberos, the admin needs to be the principal for our end user.
At this point we can start NiFi:
./bin/nifi.sh start
Kerberos Login
There are two ways we can authenticate to NiFi using Kerberos:
- Kerberos Login - NiFi presents a login screen and authenticates the user against the KDC
- SPNEGO - A ticket that was established outside of NiFi is forwarded to NiFi through the browser
If we navigate to NiFi in our browser at https://nifi.apache.org:9445/nifi, assuming we didn’t already configure our browser for SPNEGO, then we should get prompted with a login screen:

NOTE: If you have a client certificate in your browser that corresponds to this NiFi instance, you may get prompted to use that certificate, but we want to decline in this case so that we end up at the login page.
At this login screen we can enter the principal name and password (in this example bbende and bbende) and we should get authenticated and see the NiFi UI:
SPNEGO
Using SPNEGO requires some extra configuration in your browser.
Firefox
Using Firefox requires going to the about:config page and setting the following properties:
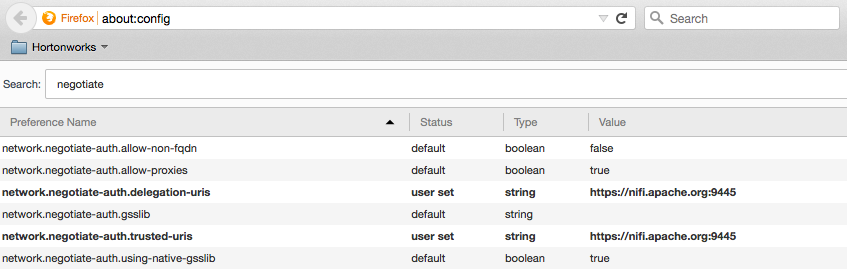
NOTE: The trusted URIs are the host and port being used to access NiFi in the browser, which in this case is https://nifi.apache.org:9445. This works because of the mapping we setup earlier to map nifi.apache.org to localhost.
If you followed the steps earlier, you probably already have a ticket, but you can check by issuing klist. If you don’t see a ticket for your user principal then you need to perform a kinit:
kinit [email protected]
You should then be able to go to the NiFi UI in your browser without requiring a login.
Chrome
Using Chrome you can perform similar steps to configure it. From the terminal where you performed the kinit, run the following commands:
defaults write com.google.Chrome AuthServerWhitelist "nifi.apache.org"
defaults write com.google.Chrome AuthNegotiateDelegateWhitelist "nifi.apache.org"
You can verify the policies were set by opening Chrome and entering chrome://policy in the address bar.
blog comments powered by Disqus