Apache NiFi 1.0.0 - Using the Apache Ranger Authorizer
In the last post we looked at setting up a secure cluster using Apache NiFi 1.0.0 BETA, and how the new file-based authorizer can be used to setup multi-tenant authorization. The NiFi authorizer is a pluggable extension point, meaning anyone can build their own authorizer. In addition to the default file-based authorizer, NiFi provides an authorizer that uses Apache Ranger to make access decisions.
Apache Ranger is a framework providing centralized security administration for many projects in the Hadoop ecosystem. Ranger provides a central location for managing users, groups and policies, as well as a mechanism for auditing access decisions.
The remainder of this post will cover how to use Ranger as the authorizer for NiFI.
Overview
Before diving into configuration, lets take a look at what we are trying to do. The diagram below shows the overall setup and how NiFi and Ranger will interact.
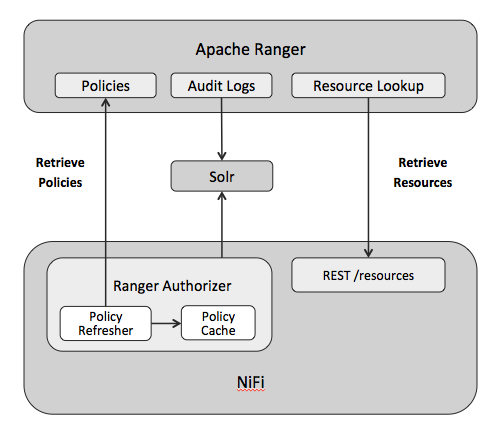
- Users, groups, and policies will be entered through the Ranger Admin UI
- Ranger will query NiFi to determine the available resources when creating policies (i.e. processors, controller services, etc.)
- NiFi will run the Ranger authorizer, also referred to as the “NiFi Ranger Plugin”
- The Ranger authorizer will retrieve policies in a background thread and store them in a local cache
- The Ranger authorizer will use the local cache to make an access decision when a user performs an action in NiFi
- The access decision will be audited to Solr and available to view through the Ranger Admin UI
Running Ranger
This post is not going to cover how to get Ranger running, as that would be a whole post on its own, but I’ve create a Vagrant project that should help, see the README for instructions.
Ranger’s integration with NiFi was introduced in Ranger 0.6.0, so at this point I’m going to assume readers can run Ranger 0.6.0 or 0.6.1.
After starting Ranger we can navigate to the Admin UI in your browser at http://localhost:6080 and login with username admin and password admin:
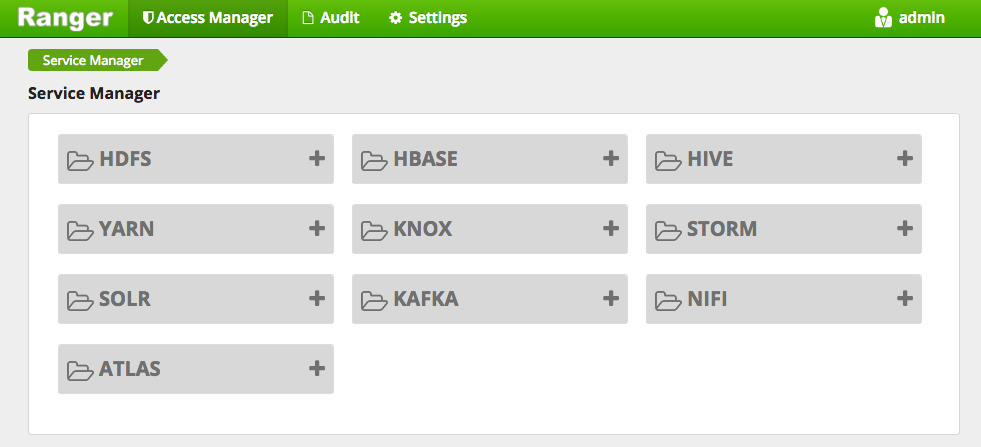
NOTE: If you managed to get Ranger running, but you don’t see NiFi in the list, check install.properties in the root directory where you extracted Ranger. The property policymgr_supportedcomponents controls the components that will be visible in the UI, and you’ll need to add NiFi to this list before running any of the Ranger setup scripts.
Before doing anything in Ranger, we need to do some initial setup for NiFi…
Configuring NiFi
Since I’m using the Vagrant project mentioned earlier, I’m going to run NiFI directly on the VM to avoid any difficulties with network connections. I’ve copied NiFi 1.0.0 BETA and the NiFi TLS Toolkit to the VM, in the same directory where Ranger is extracted.
The directory structure looks like the following:
ls /vagrant/stage/
nifi-1.0.0-BETA
nifi-toolkit-1.0.0-SNAPSHOT
ranger-0.6.1-admin
Lets create a secure stand-alone instance using the TLS toolkit:
cd nifi-toolkit-1.0.0-SNAPSHOT
./bin/tls-toolkit.sh standalone -n 'localhost' -C 'CN=bbende, OU=ApacheNiFi' -o './target'
cd ..
cp nifi-toolkit-1.0.0-SNAPSHOT/target/localhost/* nifi-1.0.0-BETA/conf/
NOTE: The toolkit will configure nifi.properties to use port 9443 for https, and the Vagrant VM forwards that port so you can access NiFi from your local browser. Also, the toolkit will set nifi.web.https.host to localhost and you may need to remove this value when running on the Vagrant VM.
The default NiFi build does not include the Ranger authorizer, so the first thing we need to do is add the appropriate NAR:
wget http://central.maven.org/maven2/org/apache/nifi/nifi-ranger-nar/1.0.0-BETA/nifi-ranger-nar-1.0.0-BETA.nar
cp nifi-ranger-nar-1.0.0-BETA.nar nifi-1.0.0-BETA/lib/
Now that we have the NAR, lets define a new authorizer by editing nifi-1.0.0-BETA/conf/authorizers.xml and adding the following:
<authorizer>
     <identifier>ranger-provider</identifier>
     <class>org.apache.nifi.ranger.authorization.RangerNiFiAuthorizer</class>
     <property name="Ranger Audit Config Path">/vagrant/stage/nifi-1.0.0-BETA/conf/ranger-nifi-audit.xml</property>
     <property name="Ranger Security Config Path">/vagrant/stage/nifi-1.0.0-BETA/conf/ranger-nifi-security.xml</property>
     <property name="Ranger Service Type">nifi</property>
     <property name="Ranger Application Id">nifi</property>
     <property name="Ranger Admin Identity">CN=localhost, OU=NIFI</property>
     <property name="Ranger Kerberos Enabled">false</property>
 </authorizer>
Here is what each of these properties means:
- Ranger Audit Config Path is the path to the config file that tells the NiFi Ranger plugin how to perform auditing
- Ranger Security Config Path is the path to the config gile that tells the NiFi Ranger plugin how to communicate with Ranger
- Ranger Service Type is the type of service in Ranger
- Ranger Application Id is the id of this instance of NiFi in Ranger, this must line with what we entered for Service Name when added the NiFi instance in Ranger
- Ranger Admin Identity is the DN of the certificate that Ranger will use to communicate with NiFi
- Ranger Kerberos Enabled indicates if Ranger has Kerberos setup
Now we need to actually create the files referenced by Ranger Audit Config Path and Ranger Security Path…
The content for /vagrant/stage/nifi-1.0.0-BETA/conf/ranger-nifi-security.xml is the following:
<?xml version="1.0"?>
<?xml-stylesheet type="text/xsl" href="configuration.xsl"?>
<configuration xmlns:xi="http://www.w3.org/2001/XInclude">
  <property>
    <name>ranger.plugin.nifi.policy.rest.url</name>
    <value>http://localhost:6080</value>
    <description>URL to Ranger Admin</description>
  </property>
  <property>
    <name>ranger.plugin.nifi.service.name</name>
    <value>nifi</value>
    <description>Name of the Ranger service containing policies for this nifi instance</description>
  </property>
  <property>
    <name>ranger.plugin.nifi.policy.source.impl</name>
    <value>org.apache.ranger.admin.client.RangerAdminRESTClient</value>
    <description>Class to retrieve policies from the source</description>
  </property>
  <property>
    <name>ranger.plugin.nifi.policy.rest.ssl.config.file</name>
    <value>ranger-policymgr-ssl.xml</value>
    <description>Path to the file containing SSL details to contact Ranger Admin</description>
  </property>
  <property>
    <name>ranger.plugin.nifi.policy.pollIntervalMs</name>
    <value>30000</value>
    <description>How often to poll for changes in policies?</description>
  </property>
  <property>
    <name>ranger.plugin.nifi.policy.cache.dir</name>
    <value>/tmp</value>
    <description>Directory where Ranger policies are cached after successful retrieval from the source</description>
  </property>
  <property>
    <name>ranger.plugin.nifi.policy.rest.client.connection.timeoutMs</name>
    <value>120000</value>
    <description>RangerRestClient Connection Timeout in Milli Seconds</description>
  </property>
  <property>
    <name>ranger.plugin.nifi.policy.rest.client.read.timeoutMs</name>
    <value>30000</value>
    <description>RangerRestClient read Timeout in Milli Seconds</description>
  </property>
</configuration>
The main thing to note here is that we are telling NiFi that Ranger is running at http://localhost:6080.
The content for /vagrant/stage/nifi-1.0.0-BETA/conf/ranger-nifi-audit.xml is the following:
<?xml version="1.0"?>
<?xml-stylesheet type="text/xsl" href="configuration.xsl"?>
<configuration xmlns:xi="http://www.w3.org/2001/XInclude">
  <property>
    <name>xasecure.audit.is.enabled</name>
    <value>true</value>
  </property>
  <property>
    <name>xasecure.audit.destination.solr</name>
    <value>true</value>
  </property>
  <property>
    <name>xasecure.audit.destination.solr.batch.filespool.dir</name>
    <value>/tmp/audit/solr/spool</value>
  </property>
  <property>
    <name>xasecure.audit.destination.solr.urls</name>
    <value>http://localhost:6083/solr/ranger_audits</value>
  </property>
</configuration>
This tells the NiFi to publish audit events to Solr located at http://localhost:6083/solr/ranger_audits.
The final step is to edit nifi-1.0.0-BETA/conf/nifi.properties and tell NiFi to use the Ranger authorizer, rather than the default file-based authorizer:
nifi.security.user.authorizer=ranger-provider
At this point we should be able to start our NiFi instance, but lets jump back to Ranger and add a service definition to represent this NiFi instance.
Creating a Service Definition
Back in the Ranger Admin UI, lets click on the + icon next to NiFi to define a new NiFi instance in Ranger:
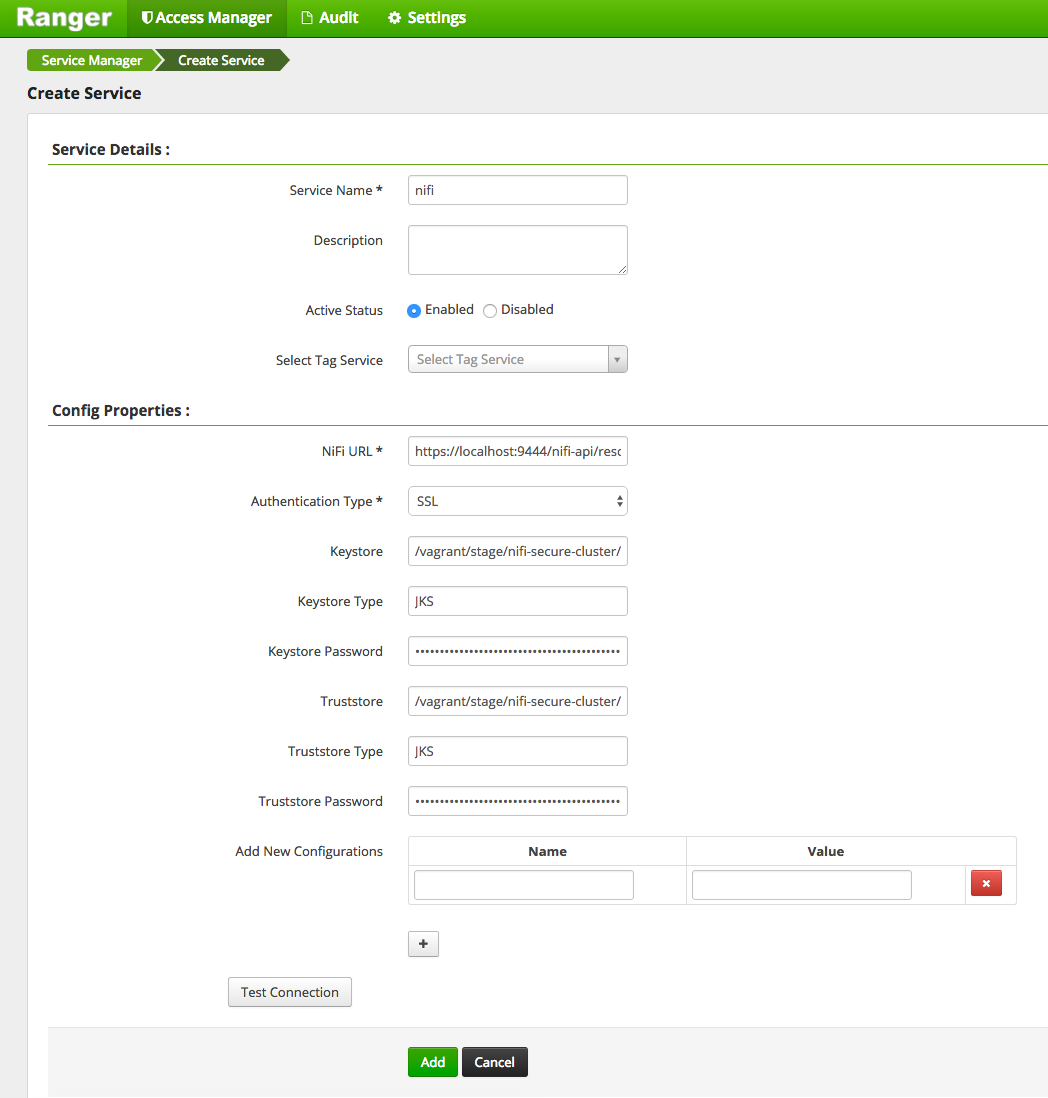
When defining the NiFi service in Ranger, we need to provide a certificate and truststore that Ranger can use to communicate with NiFi. We are going to use the keystore.jks and truststore.jks from NiFi, so we provide the following config:
- Service Name - nifi
- NiFi URL - https://localhost:9443/nifi-api/resources
- Authentication Type - SSL
- Keystore - /vagrant/stage/nifi-1.0.0-BETA/conf/keystore.jks
- Keystore Type - JKS
- Keystore Password - The value of nifi.security.keystorePasswd from /vagrant/stage/nifi-1.0.0-BETA/conf/nifi.properties
- Truststore - /vagrant/stage/nifi-1.0.0-BETA/conf/truststore.jks
- Truststore Type - JKS
- Truststore Password - The value of nifi.security.truststorePasswd from /vagrant/stage/nifi-1.0.0-BETA/conf/nifi.properties
For now we won’t test the connection because we haven’t started NiFi yet, so we’ll just click Add and we should see one NiFi instance on the main page:
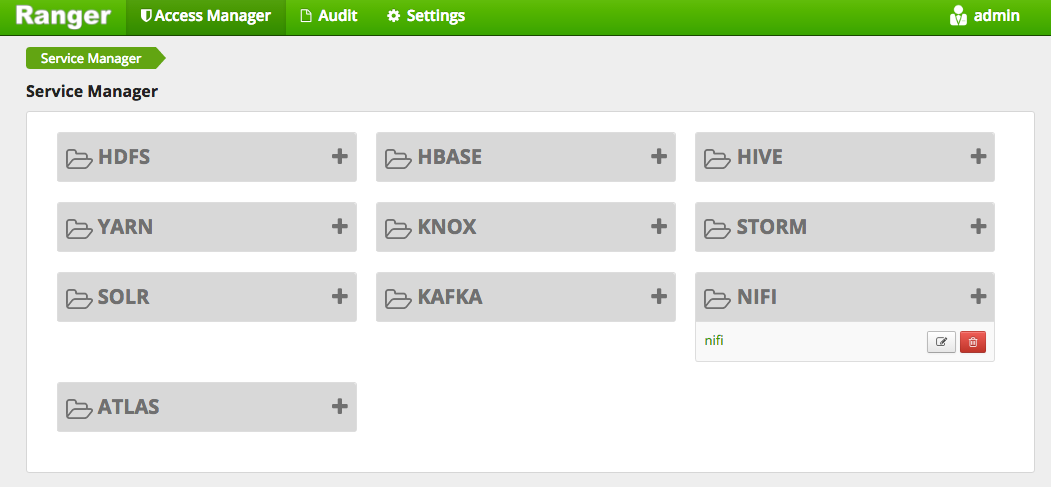
If we click the link to that instance, we can start defining policies:
Lets come back to that later…
Starting NiFi and Testing Authorization
Now that we have a service definition in Ranger, we can start our NiFi instance:
./nifi-1.0.0-BETA/bin/nifi.sh start
After waiting for NiFi start, we can navigate to http://localhost:9443/nifi in our browser. At this point we should get an access denied page because we haven’t defined any policies in Ranger. If we look at the Access tab on Ranger’s Audit view, we can see the request that was denied:
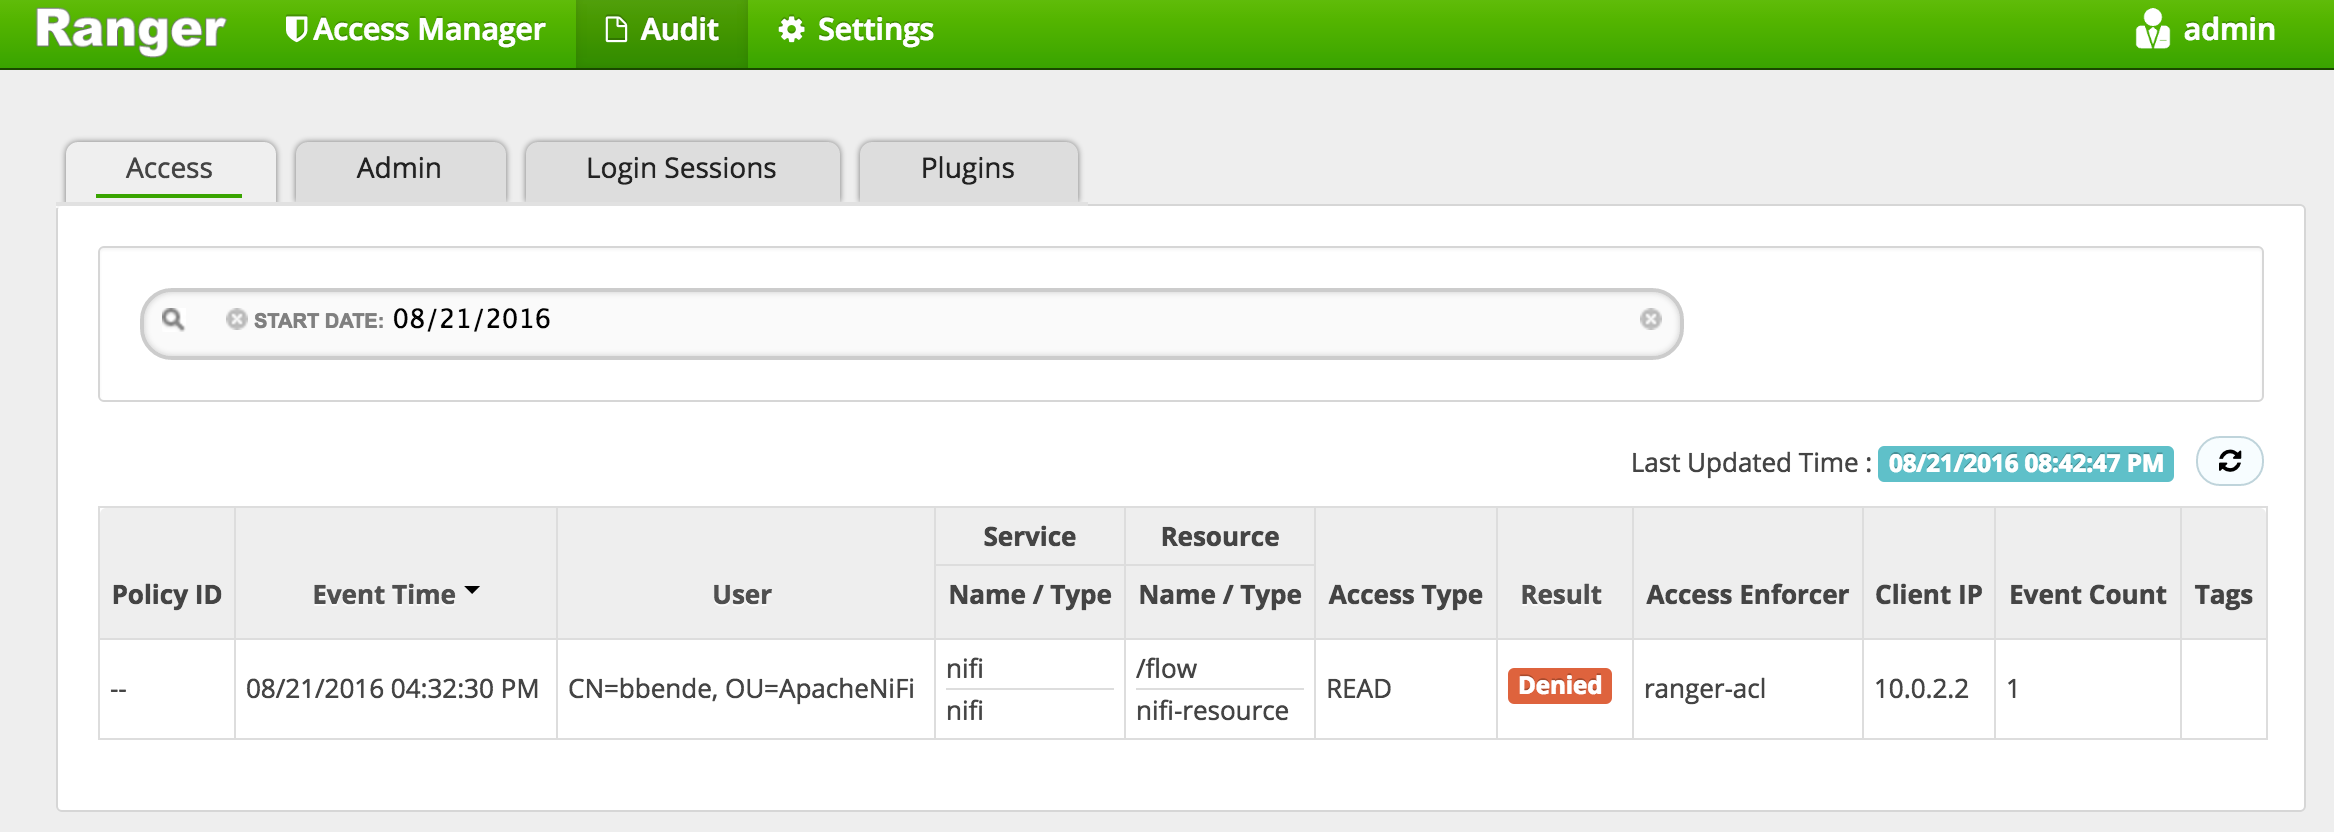
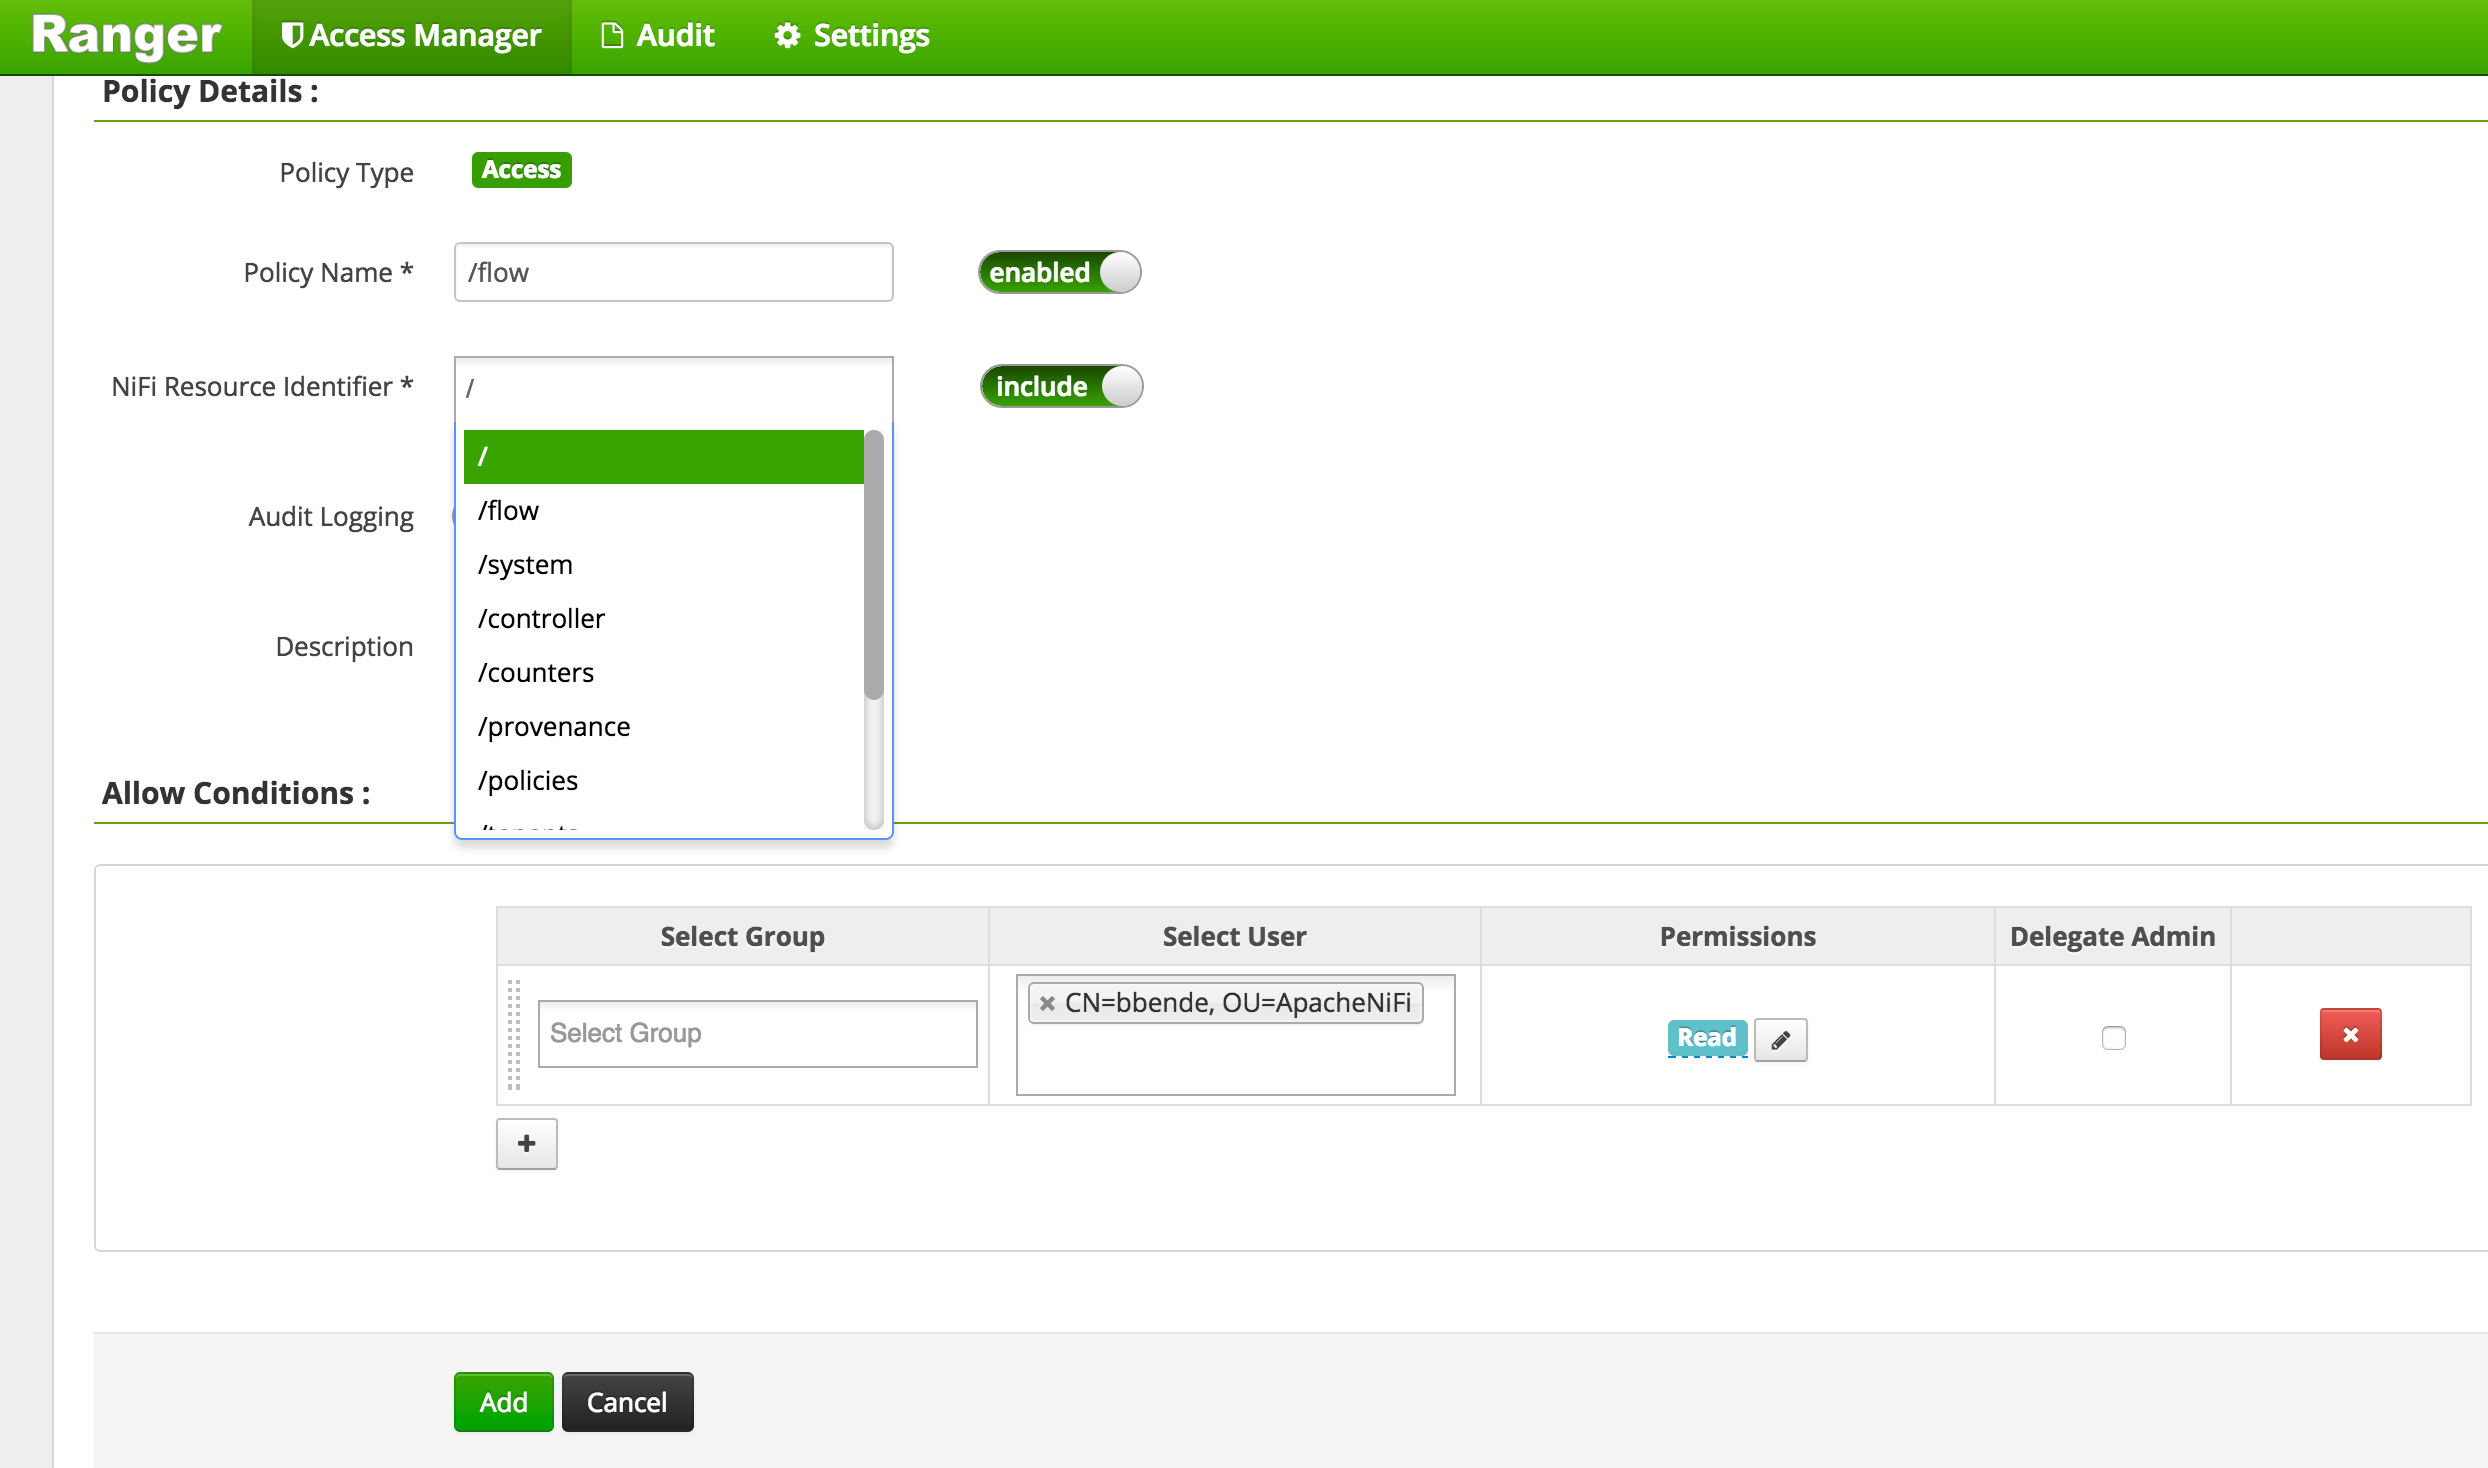
This tells us that to get into the NiFi UI we would need a policy granting READ access to the “/flow” resource. So lets go ahead and create that policy…
Creating Users and Policies
The first thing we need to do is create a user in Ranger. We can do that by clicking the Settings menu and selecting Users/Groups, and then clicking Add User:
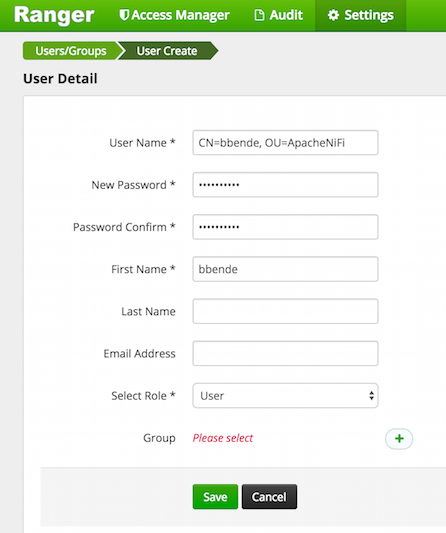
The username should be the DN of the client certificate we are using to access NiFI. In this case I am using “CN=bbende, OU=ApacheNiFi”. Now we can start creating policies for that user…
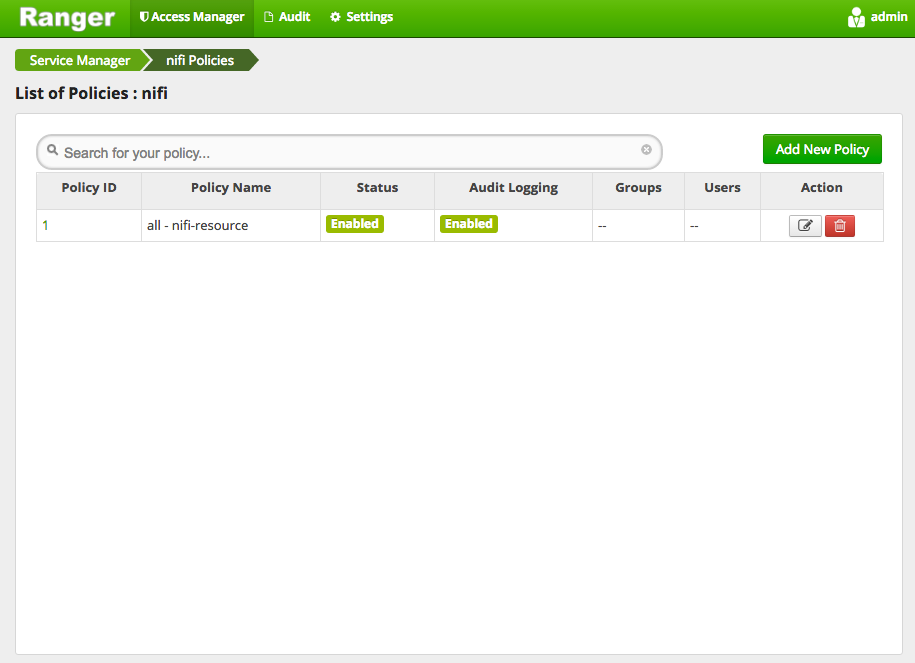
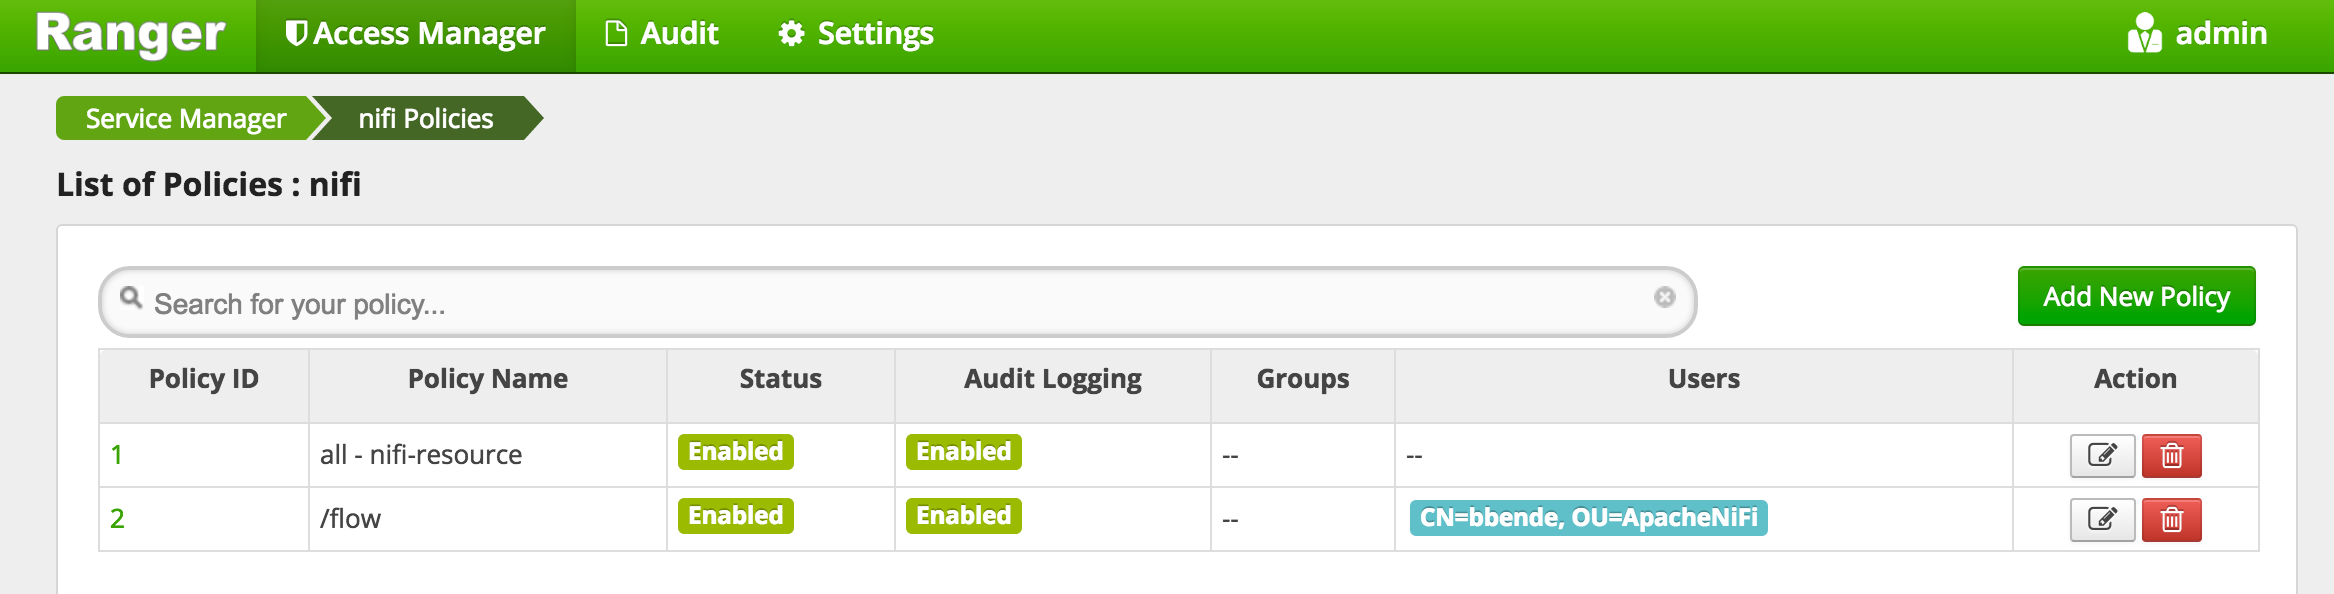
If we go back to the main page of the Ranger Admin UI and click on the NiFi instance we created earlier, we can click Add Policy. Lets create a READ policy for “/flow”:
After adding the policy we should now see it in the list of all policies:
The NiFi Ranger plugin will periodically poll Ranger and should eventually retrieve this new policy. If we go back to the NiFi UI and refresh, we should see a read-only view of the UI:
If you remember from last post, the UI is read-only because there are no policies defined for the root process group.
If we wanted to modify the flow we would need to add another policy for “/process-groups/
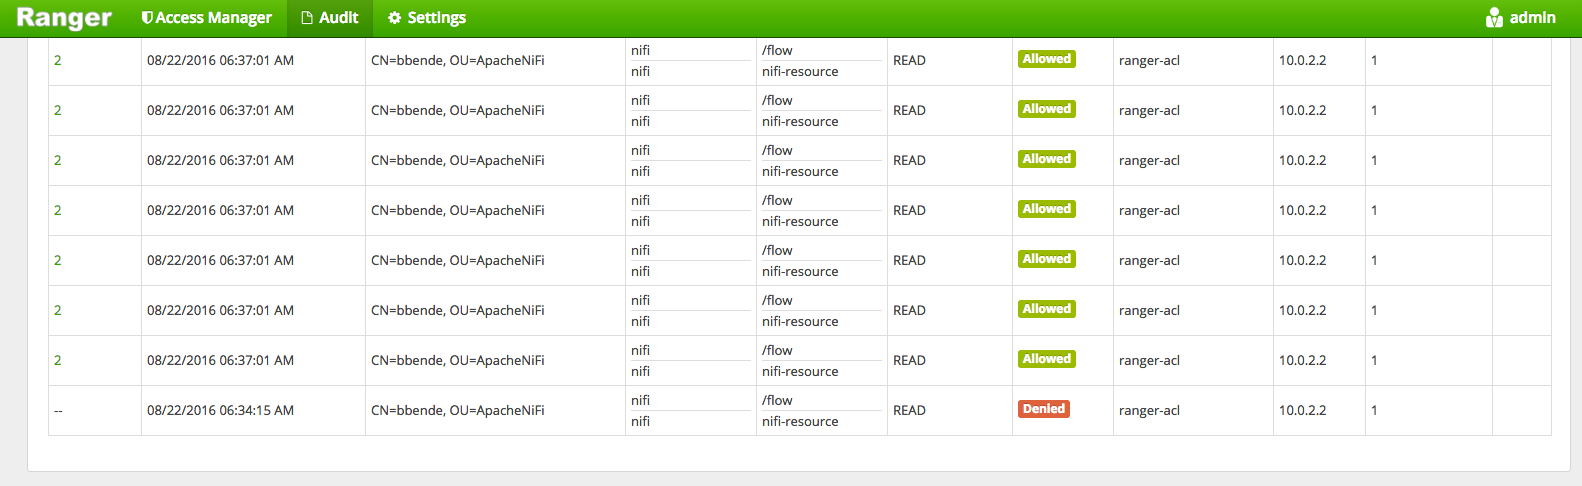
After accessing the NiFi UI we should also be able to see successful access attempts in the Ranger audit logs:
In addition to auditing user events, Ranger also audits when plugins retrieve policies. If we click on Plugins under the Audit screen we can see when our NiFi instance retrieved policies from Ranger:
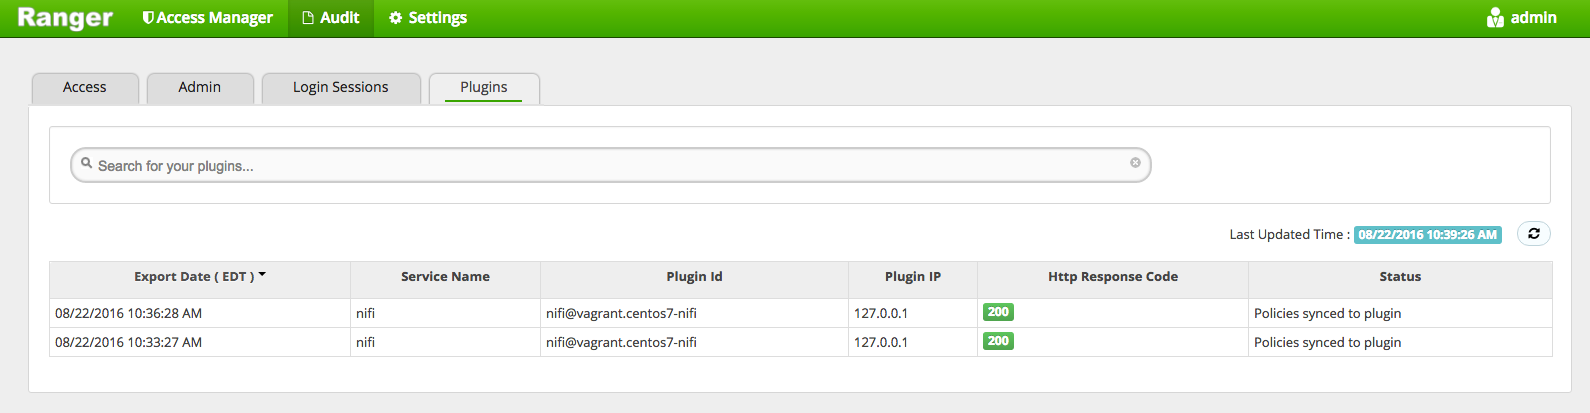
The NiFi Ranger plugin will only retrieve policies when the policies have changed, so we see two events, the first when NiFi initially started, and the second after we added the policy for “/flow”.
Summary
This post should give you an idea of how Ranger can be used as an authorizer for NiFi. From here you can experiment with defining additional policies in Ranger and seeing their effects in NiFi.
blog comments powered by Disqus